Quantcast
Channel: The NeoSmart Files
Viewing all 30 articles
Browse latest View live

Upgrade from Windows 7 to Windows 10

$
0
0

Did you skip Windows 8? Interested in upgrading your PC from Windows 7 to Windows 10, but not planning on installing Windows 8 in between? You’re in luck. The next version of Windows, Windows 10, aka Windows codename “Threshold” will let you upgrade from Windows 7 just fine.

Windows 10 will automatically offer to upgrade from Windows 7.

Windows 10 will automatically offer to upgrade from Windows 7.

After setup begins, it’ll automatically go through the process of checking your PC for compatibility, then offer to upgrade your PC from Windows 7 to Windows 10. In the past, Windows Setup has done that before, but the “upgrade” option is actually a tricky “keep personal files but not apps” in reality – clicking “Help me decide” will reveal the truth:

You can choose what to keep and what not to.

You can choose what to keep and what not to.

In this case, Windows 10 setup is actually offering to upgrade your Windows 7 PC and keep your applications/software/documents intact.

Note that you won’t be able to upgrade from 32-bit (x86) Windows 7 to 64-bit (x64) Windows 10. It’s unclear as of right now whether or not Microsoft will be releasing a 32-bit version of Windows 10 at all come RTM. In the past, there were rumors that Windows 8 would be 64-bit only, but that proved to be a moot concern and 32-bit versions of Windows 8 (as ill-advised as they may be) have been chugging along just fine. Windows 10 Technical Preview is available for download in both 32-bit and 64-bit ISO for now.


Turn ISO files into bootable USBs with Easy USB Creator

$
0
0

Please welcome the newest member of our Easy suite of system utilities: Easy USB Creator!
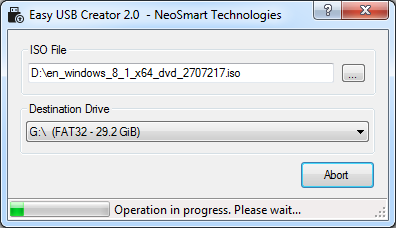

Joining the ranks of EasyBCD and Easy Recovery Essentials is our newest utility, designed to convert ISO files intended for burning to a CD or DVD into bootable USB sticks, USB flash drives, USB jump drives, or external USB drives with just a single click. Easy USB Creator has been designed to be as straight-forward and easy to use as possible, and has been tested for maximum compatibility with all PCs in various configurations.

Easy USB Creator

Upon selecting the ISO file you wish to convert to a USB, Easy USB Creator will automatically detect the type of the ISO or IMG file that you are trying to convert, and will take the necessary actions using a heuristic that will try to ensure maximum compatibility with your PC, as well as attempt to make any necessary adaptations to the contents of the ISO file as needed to make it work as a bootable USB.

Download Easy USB Creator 2.0

[purchase]

Easy USB Creator will run on all versions of Windows and will convert ISO images for all versions of the Windows setup DVDs/CDs and various recovery and repair utilities into bootable USB sticks, with full support for USB 2.0 and 3.0, and supporting MBR and GPT/EFI configurations. As a standalone utility, it’s easy to take with you and use it where and when you need it.

The free Easy USB Creator Lite Edition will only convert a subset of the recovery utilities into bootable USB sticks, the full version of Easy USB Creator can convert dozens of ISO images to bootable USBs for more convenient access, use in computers or netbooks that do not have a CD/DVD drive, faster setup of Windows, and more. In the near future, support will be expanded to include various Linux distributions and more.

System Requirements:

  • PC running Windows XP/Vista/7/8/10 or Server 2003/2008/2012
  • .NET Framework 2.0 or higher

Take it out for a spin, and let us know what you think in the comments below!

Dynamically resizing WordPress images on nginx with ngx_http_image_filter_module

$
0
0

Ever notice that image galleries on WordPress.com load faster than those on your own? WordPress.com can serve dynamically-resized images on-the-fly to improve page load speeds and create pretty-looking image galleries. You can achieve this on your own server too, with a few simple tricks in your nginx.conf, taking advantage of URL parameters WordPress appends to image uploads and the nginx libgd-based ngx_http_image_filter_module.

WordPress’ dynamic image sizes serve two main purposes: aside from resizing the source images to a smaller size, it also lets you crop rectangular images to a thumbnail without completely skewing the aspect ratio and butchering the result.

Let’s take an example WordPress gallery, created using the JetPack galleries plugin. We’re taking a mix of square (logos) and rectangular (photos) media, and framing them in circles via CSS. On a properly-configured web server, it should show up like this:

Correct Gallery


But without dynamic image resizing, the original aspect ratios can be completely skewed, and you’ll get something like this instead:

Skewed Gallery


Let’s take a look and see what is happening. When WordPress generates the blog post, the images are being created with query string arguments appended… “What’s that,” you say? “Query string arguments for static images?!” Indeed:

/blog/wp-content/uploads/Attachment-1.png?w=202&h=202&crop=1

As you can see, WordPress is requesting a cropped version of the originally-uploaded file. On a normally-configured webserver, query arguments are ignored for attachments like this. But on WordPress.com’s servers, they’re interpreted by an image processor, and resized before being served. We can see proof of this by checking the headers for a request to a resized image on a WordPress.com blog:

There’s a lot going on, but just focus on the X-Orig-Src: 0_imageresize bit to validate our assumption.

With nginx’s ngx_http_image_filter_module, you can make nginx serve up resized images too. First things first, you’ll need to make sure that nginx is compiled with this module (it’s not by default). If it’s not you’ll need to recompile nginx from source, and specify –with-http_image_filter_module:

Then we need to configure nginx.conf to tell it what parameters to use for the width, height, and crop arguments. It’s a little tricky since WordPress can issue either ?w or ?h or both, with or without ?crop=1. Also, nginx can’t resize images inside an if block, so we’re going to need to use a specific location (and a rewrite within an if) to get around that limitation:

As you can see, we default $width and $height to – (which nginx specifies as the required value for unused parameters, otherwise you’ll get a HTTP 415 Unsupported Media Type error), then overwrite one or both depending on whether ?w= or ?h= were specified. This detection is outside the location blocks, and then we have a location block for our images and a fake location block (marked as internal for security/sanity reasons) for our cropped content that will serve the same content, only use the crop instead of resize argument to image_filter.

Et voilà!

Windows 10 Embedded Product Key Tool

$
0
0

Product Key ToolWe’re proud to introduce the immediate release of our newest utility for Windows users: the NeoSmart Technologies Embedded Product Key Tool. Designed for users of Windows 7, Windows 8, and Windows 10, our embedded product key tool will retrieve and display the Windows setup product key embedded in the BIOS or EFI, allowing you to store it for safe-keeping or use it to reinstall Windows with an official Windows setup image.
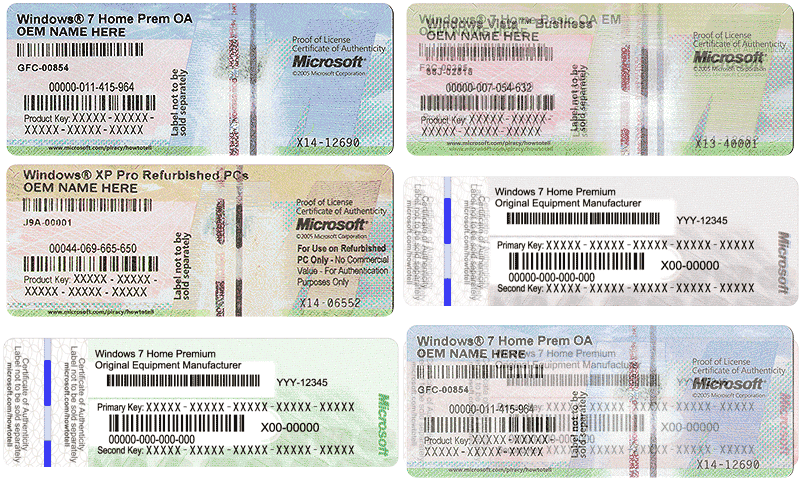
Ever since Windows 8, PCs and laptops no longer ship with the Windows Certificate of Authenticity (COA) that we’ve all become accustomed to seeing:

COA Certificate of Authenticity

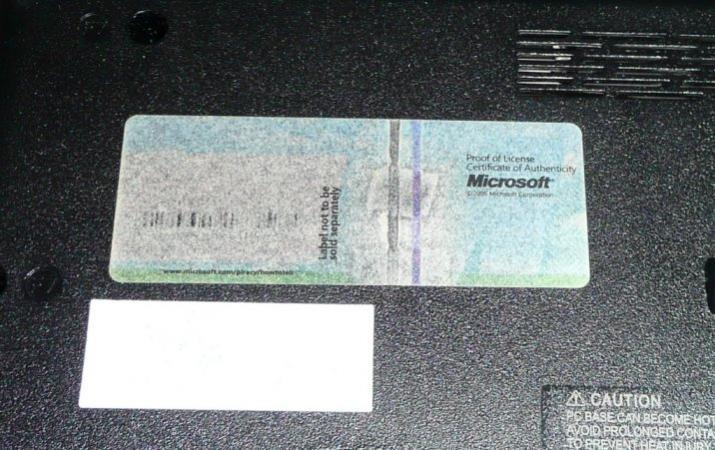
So how do you install Windows without a product key? Well, these days a product key unique to your machine (or, in some cases, to your manufacturer or make/model) is embedded into the BIOS or EFI, basically programmed into the computer itself. This prevents problems with the COA being rendered illegible, making situations like this a thing of the past:

Unreadable COA

However, the real reason computers and laptops no longer ship with COAs is because the manufacturers complained to Microsoft that having to affix a customized sticker to each and every PC or laptop they manufacture was a real (and expensive) pain in the royal you-know-what, and begged and pleaded for another option. It’s simple economics, the more-easily you can mass-produce a product with as little variations as possible, the cheaper and faster it is to make it. Microsoft capitulated, and the rest, as they say, is history.

This embedded product key is not wiped when you format or reinstall, or when you replace your hard disk – it’s stored in the NVRAM of the BIOS/EFI on the motherboard itself. Depending on what version of the Windows setup image you’re using, it might be able to retrieve the key for itself – in which case you’ll never be prompted to enter your key. It’ll just directly read the programmed code from the BIOS and continue on its merry way. However, if you’re trying to install Windows 7, Windows 8, or Windows 10 and you don’t have a COA because your manufacturer is using an embedded product key but your setup image doesn’t support it, or if you’re trying to retrieve your key for safe-keeping or other purposes, our product key tool will retrieve and display it for you, without even a single click:

Windows 10 embedded product key utility

So the next time you go crawling under the desk looking for a product key to copy down (or snap a photo of), don’t worry too much when you don’t find one: just download our product key utility (it’s free!) and use it to get a copy of your embedded product key.

Download Windows Product Key Tool

Free up space on an iPhone by compressing your photo album

$
0
0

Most people that have had iPhones for more than a year or two have accumulated a massive amount of photos, at least several gigabytes in size. With iPhones still only shipping with a puny 16 GiB of storage by default (unless you pony up the $100 for a huge jump to the 64 GiB model with the iPhone 6/6+), Apple has been making a lot of money off of people looking to keep their photos and still have room to take more. But there’s another option: you can optimize and compress your existing photos to make them take up less space, and recover free space for your use.

Using the right tools and depending on the nature of your photos and images, you’ll be able to recover anywhere from 5% to 20% of your photo album size with these instructions!

Depending on the whether or not your iPhone is jailbroken, you’ll be able to carry out the instructions in either one or two passes. Note that there are a lot of various utilities and tools used below, you’ll need to obtain them by downloading from the respective websites, building from source, or using a package manager (apt, brew, yum, pkg, etc).

Requirements:

If you have a jailbroken iPhone, you can connect directly to the iPhone and carry out the image optimization over ssh (via sshfs). For best performance and reliability, we’ll set up a TCP/IP tunnel over USB instead of connecting over the wi-fi, using itunnel:

./itnl --lport 9990 --iport 22 &

And then mount the iPhone over SSH:

mkdir /Volumes/iPhone
sshfs -p9990 -o reconnect -C root@localhost:/ /Volumes/iPhone/

And then CD into the photos directory:

cd /Volumes/iPhone/var/mobile/Media/DCIM/

If your iPhone isn’t jailbroken, what we’ll do instead is create a backup via iTunes, CD into the backup directory, then optimize the images on the local PC. Once that’s done, we can restore the backup to the iPhone with the new images.

Next, we’ll optimize the images in three steps:

find . -iname "*.png" | parallel -j 8 --verbose 'pngcrush -brute {} {}2 && mv {}2 {}' \;

This command uses pngcrush to optimize all PNG images, usually created by taking screenshots or saving images from the web. You can remove the -brute parameter to speed up the process significantly, at the cost of lower space savings.

Note: While pngcrush can read and write to the same file in a single pass (by specifying -ow to overwrite), this is not threadsafe as it will write to a temporary file of the same name for all threads! As such, we manually specify the new file name and then move it back to overwrite the original.

find . -iname "*.jpg" | parallel -j 8 --verbose jpegtran -copy none -optimize -outfile {} {} \;

This step uses jpegtran (preferably the mozjpeg version) to optimize all JPEG images, the default format used by the camera app on the iPhone. As jpegtran does not use a lot of CPU resources, we use 32 threads on an 8-core machine to completely saturate the USB link. You can experiment with the job count for best performance.

find . -iname "*.thm" | parallel -j 8 --verbose 'cjpeg -quality 75 -optimize {} > {}2 && mv {}2 {}' \; 

In this step, we recompress and optimize all thumbnails stored on the iPhone. Since thumbnails are lossy by default, we can use a lower quality version here. The degree of lossiness can be modified by changing the -quality parameter, but 75 is the most common value.

Optional: We can now re-run the above steps on /var/mobile/Library/SMS to compress PNG and JPEG attachments in messages (iMessage or SMS), to possibly save a lot more free space.

Everything you ever wanted to know about how your PC boots up

$
0
0

PC LoadingHave you ever wondered just what is it, exactly, that happens when you press that simple “power” button on your PC? How does your computer go from electricity reaching the power supply to the BIOS power-up sequence on your screen, how the computer checks attached disks and devices, and how it decides which to load from?

Or perhaps you’ve wondered what happens next, after your computer’s BIOS has chosen a drive and wants to pass control of your PC on to the target disk? What role does the MBR play in this process, and how does the core bootloader – a simple, single file sitting, forlorn, all on its lonesome in a plain-jane directory on your PC – wind up being executed and put in control of the madness that is the boot process?

Part one of our “everything you ever wanted to know about how your boots up” series covers these questions and much, much more; delving into the depths of the boot process, and exploring the intricate connections between the worlds of hardware and software, and the various conventions and standards that hold everything together. It’s a bit of a lengthy read, but there’s a lot to learn!

Read now: The BIOS/MBR Boot Process

Future parts in this series will, insha’Allah, include an article on the similarities and differences in the  BIOS vs the EFI and the MBR vs the GPT, and another article on the opposite-but-eerily-similar boot process involved in the completely-new UEFI/GPT specification.

Have questions or comments? Feel free to ask any questions below, and we’ll do our best to answer or address them.

Image credit: yng from The Noun Project

Windows 10 Recovery CD Free Download

$
0
0

Windows Flag 10With Windows 10 just around the corner, we’re mighty happy to report that our award-winning Easy Recovery Essentials for Windows is now available for absolutely free for all Windows 10 users for the remainder of the Windows 10 Technical Preview program. (Which isn’t all that long, so hurry up and grab it while it’s still free!)

Easy Recovery Essentials® for Windows, for those that haven’t tried it before, is a one-click disaster recovery CD for Windows that features 100% automated diagnostics and repair for Windows PCs. It’ll automatically go through an extensive battery of tests and solve all problems as it finds them (very quickly, too!) – all you have to do is boot from an EasyRE CD or USB stick, and select the OS you want to repair.

Easy Recovery Essentials for Windows 10 joins the rest of the EasyRE product family providing the following features:

  • EasyRE is a Windows 10 repair disc that repairs all bootmgr, bcd, and winload.exe errors.
  • EasyRE is the only repair CD to repair EFI bootloader errors and problems with bootmfw.efi, winload.efi, and more.
  • Easy Recovery Essentials automatically finds and corrects issues with the MBR, GPT, and partition records, resolving issues with the active partition, incorrectly configured partition entries, recursive partition records, overlapping partitions, and corrupted boot headers.
  • EasyRE detects and resolves dozens of boot-time blue screens of death, and prevents many other BSODs while Windows is loading and when it is running.
EasyRE Windows 10 Support Testing System Memory Checking Registry Automated Repair Complete EasyRE Web Browser

Aside from the award-winning and exclusive automated repair functionality, EasyRE also presents many features useful in repairing computers and fixing problems:

  • System/registry rollback and restore
  • Offline virus scanning
  • Deleted partition recovery tools
  • Modern web browser
  • Graphical partition editor

EasyRE can be made into a bootable CD or a bootable USB, and is compatible with just about every computer (32- and 64-bit) from all manufacturers, and supports Windows XP through Windows 10, in all languages and SKUs. EasyRE is also available for servers and for computer repair technicians.

Download: Windows 10 Recovery ISO

The usual disclaimers apply: Windows 10 is still in beta, we cannot be held responsible if anything goes wrong (not that it should). While EasyRE has been fully updated and tested for compatibility with Windows 10 TP build 9926, we do not officially offer support for the Windows 10 versions of EasyRE at this time. Windows is a registered trademark of Microsoft Corporation.

Follow us on twitter and facebook for updates. Ask any questions you might have below!

Shop on Amazon.com with Bitcoins: AMZ Bitcoin

$
0
0

Amazon Bitcoin

Ever wanted to shop on Amazon.com with bitcoin? Well, now you can. AMZ Bitcoin is a service that lets you buy Amazon.com gift cards in exchange for bitcoins – any value, any time.

Unlike some of the other bitcoin websites around, AMZ Bitcoin does not rely on arbitrage or a peer-to-peer purchasing system to facilitate purchases on Amazon with bitcoin. Instead, AMZ Bitcoin allows users to instantly purchase Amazon vouchers of any value, which can then be redeemed online at Amazon.com like cash.

AMZ Bitcoin is a fully-anonymous service, and does not use or store any personal data, and does not require the creation of an account or verification of email and/or identity.

Currently, AMZ Bitcoin takes only a $1.50 transaction fee for all gift card purchases.

Shop now: AMZ Bitcoin


Life in a post-database world: using crypto to avoid DB writes

$
0
0

CryptoPossibly one of the biggest hurdles that stands in the way of fostering innovation and discovering newer and better techniques of doing old things is the ease with which developers and designers today can quickly research and find so-called “best practices.” While a quick Google search for “user table structure” or “best way to design password reset” can reduce (but never extinguish!) outlandish practices and horrific mistakes, it does nothing to encourage developers to think outside the box, and results in the perpetuation of less-than-optimal approaches.

To that end, there’s one thing in particular that virtually all documented approaches get wrong, and that’s writing to the database when you should be using modern cryptography instead. It might sound like a bit of a non-sequitur — after all, what does storing information have to do with cryptography when one usually exists only to supplement the other? Which is exactly right. Too often, you’ll find software writing to the database not because it needs to store something, but because it needs to guarantee something. Which is what cryptography is for.

Without searching for contrived examples, here we’ll present a few real-world cases – ones that might likely even be in your codebase as we speak. Switching from reading and writing from/to the database to using modern crypto to validate information not stored in the database will fix code that’s more often than not hard to scale, impossible to maintain, and performs poorly to boot.

Case Study 1: Resetting user passwords

Let’s say you have a clean and simple database table for your application’s users:

[userId|email|bcryptHash]

Then you decide to add functionality to implement password resets, in the event that users forgot their password. Users use a form to provide their email address, and if that email corresponds to a known userid, an email is sent with the link to reset the password. You can’t just send them a link to http://myapp.com/resetPassword?userId=johnnysmith because obviously you need to validate that the request came from the email you sent – verifying that the link was one you generated. So you end up with another table like this (because normalization!):

[resetToken|userId|expirationTime]

You’re generating a reset token when the user requests a password and sending it to them via email. And to head off people that will try to reuse the token, you put in an expiration time, and of course you also delete this record in case when the user logs in, when the password is reset, and so on and so forth – meaning you need read/write access to the database in all of these cases, and code to check/delete existing records to prevent attackers from using a password reset token if the target user didn’t, or if they already did but before the expirationTime was reached, etc. In other words: a maintenance nightmare, filled with security gotchas, difficult to scale, and hard to write.

What you should be doing is much simpler, faster, and more secure. Don’t add another database table, don’t write information you don’t actually care about to the database (basically, anything you’ll be deleting soon!), and don’t rely on recording and comparing information to check if it’s been tampered with. Instead, use a cryptographic hash to generate a secure URL the user can use to reset their password. Without delving into the implementation details, this is what the end result would look like:

http://myapp.com/resetPassword?userId=johnnysmith&expirationTime=1356156000&token=%SECURITYHASH%

It’s easy enough to see how we can use a cryptographic hash like HMAC256 to generate a token we can use to verify that the request to reset Johnny’s password did indeed generate from us and will expire on Dec. 22, 2012 (bonus points to anyone that gets the reference). But how can we do the additional checks such as verifying the password reset URL isn’t reused multiple times before it’s expiration date and preventing its use if Johnny remembers his password and changes it himself?

Answer: include any fixed data which you want to check against in the hash itself.

In this case, the %SECURITYTOKEN% in the link above could be formulated like this:

HMAC256("userId=johnnysmith&expirationTime=1356156000&oldBcryptHash=$oldBcryptHash&clientIpAddress=$clientIpAddress", $mySuperSecretKey)

Then when the user request comes in, simply concatenate the current values of parameters like oldBcryptHash and clientIpAddress as retrieved from the database to the information they provided in the URL itself (the userId and the expirationTime, which are dynamic and will need to be provided by the user), and calculate the HMAC for a “valid” request. If at any point since the token was generated the user changed their password, switched computers, etc. the request would simply not authenticate. You can “store” as much or as little info as you like in the hash, without needing the client to play it back to you, without having to record anything in the database, and without needing to worry about clearing db tables for certain events.

Case Study 2: Creating new accounts that require email activation

Raise your hand if you absolutely require users to validate their emails before creating a full account on your site, but still create the user record in the database and mark it as “unverified” when they provide their info, then cross your fingers and pray your user comes back with a validated email address token to finish creating their account and set them on their merry way.

There’s a better way. There always is.

When a user creates an account on your site, you can send them a link to validate their account info without having to store it unvalidated in your DB just yet.

http://myapp.com/createAccount?email=johnnysmith@gmail.com&token=%SECURITYHASH%

Now you don’t have to worry about clearing old bitrot from the database or worrying about when to expire non-verified accounts. In this event, %SECURITYHASH% would be the HMAC of just the secret key and the email, but it could be extended to contain other data such as the requested username, an expiration time, etc. though you’ll need to pass some of that info back and forth in the validation link.

The keen-eyed will notice that we’ve avoided shuttling too much data back and forth in URLs given to users by making the validation step the first step, but only out of a desire to generate cleaner URLs. In this particular case, when the user returns to the site we can collect the remaining information, such as the password, their second aunt three-times-removed’s maiden name, and the middle initial of their first crush’s current wife. We could just as easily have collected all this upfront and included it in the validation URL in the email (as an encrypted query string, of course). If you’re sending RTF or HTML emails with pretty links, it’s definitely not a bad option, though users using plaintext email clients will probably curse you until they’re blue in the face at the sight of a twenty-line URL. And the AOL users.

One thing to keep in mind: because we didn’t write in the database, if you’re using usernames independent of emails and you collect all information up-front, multiple persons can request the same username and you won’t know it’s under contention until two or more of them get back to you with the validated URLs. Make sure to check availability once they’ve returned to your site – this new paradigm will take a bit of getting used to!

Case Study 3: One-time-use and expiring resources

Traditionally, many webapps generated one-time-use and expiring content by creating records in a table with a unique id and, optionally, an expiration date. For example, links to paid downloads, access tokens giving permissions to carry out an action (backend admin tasks, posting to an account, etc), and storing login sessions. This one is fortunately something a lot of developers have already embraced HMAC signatures for, primarily thanks to AWS/S3 and its heavy use of HMAC for signed requests.

Instead of creating a table in the database and generated unique IDs for your users to use once, validating requests against its contents, and removing them when they’ve been used or expired, signed URLs that make it possible to verify that the request was created/signed-off-on by you, without needing to record proof of it anywhere. That’s the point of HMAC signatures: the fact that the client knows the right signature is proof that you gave it to them.

Conclusions

Signed requests can completely transform the way you write code and change absolutely everything about the way your application behaves and runs. Signed requests are easier to maintain since the proof is, as they say, in the pudding – meaning you don’t need to keep your database schema in-step with your code and you don’t need to write down every little detail you don’t actually care about just to make sure it initiated from you in the first place. It frees up your code from having to access the database for every little nitty-gritty, and you can even run simpler web applications entirely without a database.

There is one really important caveat in all this: once the data’s signed and out of your hands, it’s really out of your hands. If you make a mistake, there’s no way of taking it back unless you reset your security token! You can’t just go in the database and delete a single bad record (which you should never be doing anyway, everything should be systematic!), you’ll need to revoke all or nothing. You could also hash a version number with your security token (you don’t need to include it in the URL given to the client), but that’s ultimately the same thing, cryptographically speaking.

One last thing: this is all operating under the assumption that this is data you don’t want. If you want to record users that registered but never validated their email and went through with creating their account so you can bug them again to do so at a later date (only you don’t really know if they provided a real email, do you?) or if you want to be able to see (for some crazy reason) the list of pending password resets for your users’ accounts, you’ll obviously need to store these in the database. But then why are you reading this article anyway?

Hello iReboot 2.0!

$
0
0

About Everyone, please say hello and welcome to iReboot 2.0! Officially under beta since May 2010, iReboot 2.0 commemorates Pi Day 2015 with the spirit of less is more and simply brings fit and finish to an already rock-solid release.

iReboot is EasyBCD’s little helper: a simple and to-the-point taskbar icon that sits in your tray and gives you a right-click menu you can use to choose which OS to boot into. Done. iReboot 2.0 is designed with function and pragmatism in mind, and we’re proud to announce that the new 2.0 release just takes it that much further.

While iReboot has always sat a little in EasyBCD’s shadow, it has truly come into its own and we’re extremely grateful to all of the loyal users who have built up quite the dedicated fanbase for iReboot and have contributed ideas and pointed out flaws over the years.

iReboot 2.0 brings more of what you loved about iReboot 1.1.1 but remains steadfast in its footsteps. A full changelog is available, but here our some of our favorite points:

  • Reduced memory footprint
  • Configurable options including always booting into the OS you’re running and changing the default OS instead of the one-time boot target.
  • Communication between backend service and taskbar client takes place via shared memory, no more TCP listeners and no more firewall conflicts (don’t ask).
  • Entries are prefixed with bullets to bolster cognition and boost productivity
  • iReboot can be run with the service disabled if running as an administrator with UAC off, should you so desire.
  • The target of the next boot will show a checkmark when iReboot is started – no more guessing what EasyBCD was set to or what you chose on last boot.
  • Universal single-binary .NET 2.0/3.5 and 4.0/4.5 support.
  • New about screen dialog featuring the NST colors (see above). Isn’t she pretty!

Download iReboot 2.0 (295 KiB)

[buy] [changelog]

iReboot is free for home use, and commercial licenses can be had for $10 for a limited time from our online store. Buy a license and help support future development of iReboot, EasyBCD, and other cool, life-saving software!

iReboot Large About iReboot About iReboot
Viewing all 30 articles
Browse latest View live